Flight Summary
In this second FSA Learning Flight, you'll become familiar with basic IFR operations by flying from Jackson Hole Airport (KJAC) to Salt Lake City International Airport (KSLC). Along the way, you'll learn about Standard Instrument Departures (SIDs), navigation along Airways, Standard Terminal Arrival Routes (STARs), and how to fly an ILS approach.
Intro to IFR Flying
Departures (SIDs)
Airways
Arrivals (STARs)
ILS Approaches
Airports Visited in this Flight

Jackson Hole Airport (KJAC)
Addon Scenery Recommendations

Salt Lake City International Airport (KSLC)
Introduction
If you've completed Learning Flight 1: VFR Introduction, you should have a good understanding of visual flying. Now, we're going to move into the IFR (Instrument Flight Rules) world. Under IFR, pilots use instruments to navigate without visual reference to the ground. Because IFR allows pilots to fly without being able to see outside, air traffic control (ATC) plays an important role in keeping aircraft safely separated from hazards. As a result, all pilots flying IFR follow a series of structured rules and procedures to ensure they fly safely, without being able to see terrain or other aircraft that would typically be avoided visually.
Ground School Seminar: IFR Procedures
To learn more about the concepts introduced in this Learning Flight, consider Boston Virtual ARTCC's 40-minute IFR Clearances Ground School. In that video, real-world flight instructors will walk you through SIDs, STARs, IFR clearances, and other procedures in more detail.
This first IFR flight will focus on "conventional" navigation: navigation that uses ground-based aids and that doesn't require a GPS or add-on navigation data. Starting with Flight 3, we'll introduce the more modern concept of Area Navigation (RNAV).
As a reminder, if you're planning to do the Learning Flights offline in single player mode, be sure to disable the default ATC. IFR arrival and departure procedures, as well as several other concepts discussed in the Learning Flights series from this point forward, are not simulated well (or at all) by default ATC. Attempting to fly these flights using default ATC will likely leave you and the virtual controller very confused!
When flying IFR, ATC is generally responsible for keeping you safely separated from other aircraft. ATC also plays a role in keeping you safe from terrain and obstacles. To receive these IFR services from ATC, you'll need to obtain a specific IFR clearance. Generally, an IFR clearance tells the pilot what to expect during a flight.
All IFR clearances follow a specific pattern; the acronym "CRAFT" is often used as a pneumonic to help remember the different elements of an IFR clearance. Each IFR clearance includes:
Clearance Limit (normally your destination airport).
Route of Flight (including a departure procedure, if applicable).
Altitude (normally an altitude to maintain and sometimes a time by which to expect a higher altitude).
Departure Frequency.
Transponder (Squawk) Code.
A sample IFR clearance given by ATC to an aircraft flying to Salt Lake City might sound like:
"King Air 38173, cleared to the Salt Lake City Airport via the ALPIN TWO departure, Idaho Falls transition, then as filed. Climb via SID except maintain 16,000. Departure frequency 133.25. Squawk 0612."
When flying with ATC, despite what you file in your flight plan, it is ultimately the route that ATC assigns (and you accept) that you will be responsible for flying. If you receive a clearance or instruction that you are unsure of, respond with a form of the word "unable" and discuss the available options with ATC.
Locate and Fly a Standard Instrument Departure (SID)
A Standard Instrument Departure (SID) is an ATC procedure used to provide an orderly transition from the airport to the enroute environment, while offering obstacle clearance. You'll find SIDs at most controlled airports and some smaller, uncontrolled airports. An ATC clearance must be received prior to flying a SID.
Using your charts source of choice (recall that we introduced you to AirNav in Learning Flight 1), view the available instrument procedures for Jackson Hole Airport (KJAC). You'll see that the only SID available is the ALPIN# departure. You may also notice the GEYSER and TETON procedures. These are Obstacle Departure Procedures, not SIDs, and we'll cover them one of the next flights.

For SIDs and STARs, the FAA denotes changes by updating the version number. The first version will be ALPIN1. When the procedure gets updated, it will become ALPIN2, and so on. After the ALPIN9, the number resets and the procedure returns to the ALPIN1. In these materials, the format "ALPIN#" will be used to reference the currently-published version of the procedure.
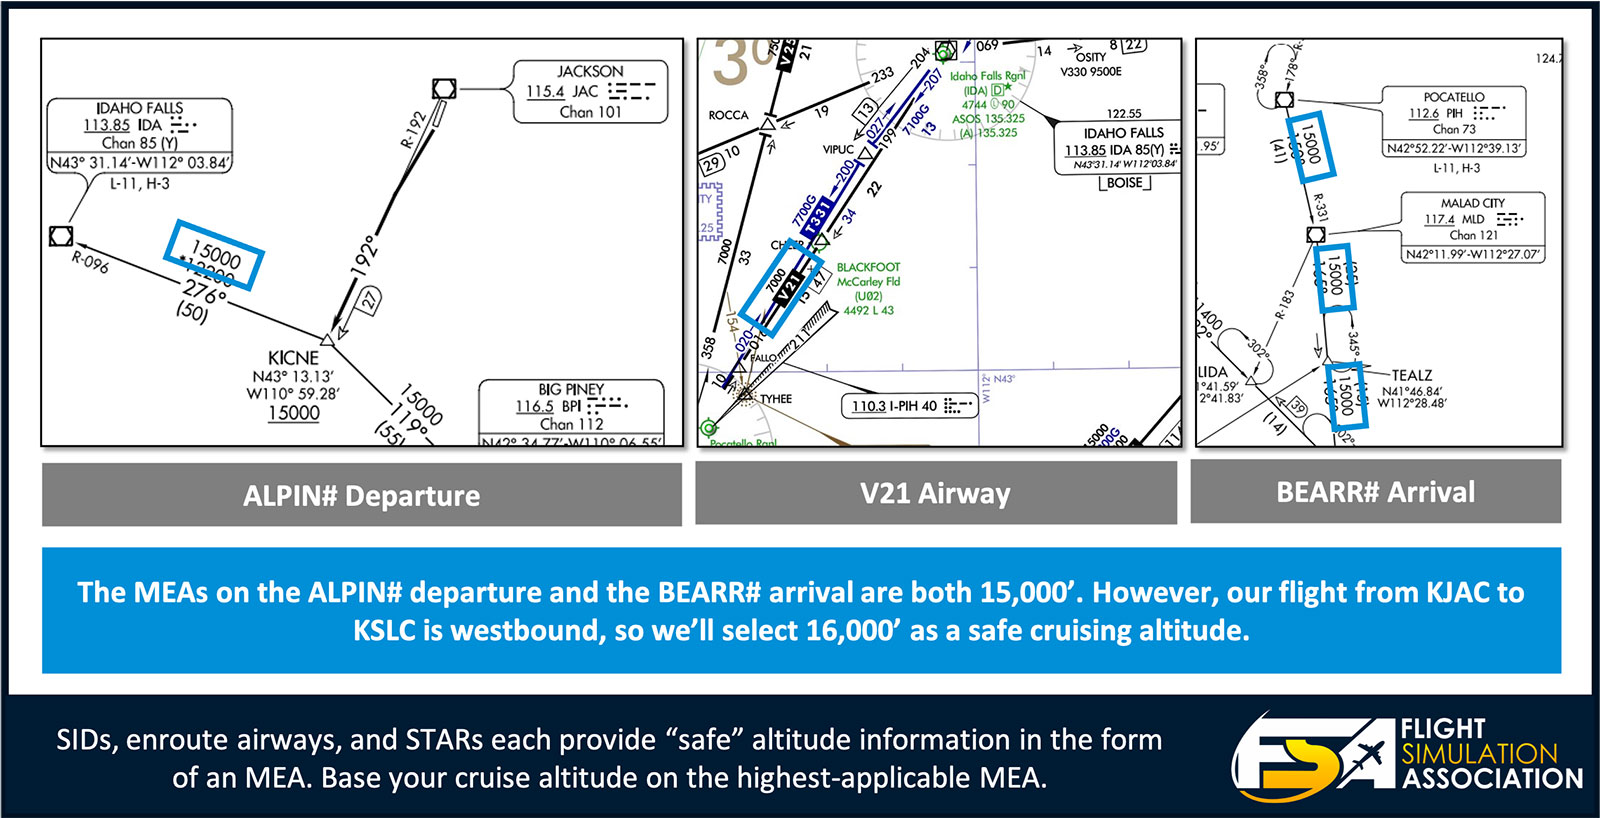
Download and open the ALPIN# departure. The chart includes a plan view that depicts the lateral routing along with a "Departure Route Description" providing further details. Sometimes this information will be split across multiple pages. Reviewing each page is important because significant obstacles or limitations are sometimes included. On this SID, you can see that departures from Runway 1 are not authorized ("NA") and that departures from Runway 19 need to climb at least 341 ft. for every nautical mile up to 15,000 ft. in order to avoid the nearby mountains. You'll also notice the top altitude—the maximum altitude you can climb to until given further instruction—is to be "assigned by ATC" in your IFR clearance. Other SIDs will include a specific top altitude to climb to; we'll see that in the next flight.

You can think of a SID as a set of instructions to get you flying along your filed/cleared flight plan. On this SID, as you can see from the description, after departing Runway 19, a pilot would track the JAC VOR/DME radial 192 outbound to KICNE (identified by the 27 DME) and climb to cross KICNE at 15,000 ft. or higher. Remember, you can only climb to the top altitude given by ATC in your IFR clearance. For the purposes of this flight, we'll plan 16,000 ft. as our cruising altitude and assume that ATC has given us this as the top altitude as part of our clearance.
From KICNE, a pilot either follows the IDA transition (turning direct to the Idaho Falls VOR) or the SWEAT transition, which involves navigating to the Big Piney VOR (BPI) before flying outbound on the 080 radial to the SWEAT intersection.
We won't cover how to navigate using VORs in these flights. The general concept is that you tune the published frequency into your navigation radio and then use the course or OBS setting on your VOR indicator to establish a direction. From there, you reference the instrument to make slight corrections. If you're brand new to this type of navigation, there are a number of tutorials available online that can be found using a simple web search; check out this one from FLY8MA. Or, if you're already comfortable navigating using a more advanced form of navigation like GPS, that works too!
Objective 2Navigate Using Airways
In the last flight, we used two forms of VFR navigation to get from Bozeman to Jackson Hole: pilotage and dead reckoning. Now that we are IFR, we need a form of navigation that also works if we are in the clouds and unable to see the ground. Airways are IFR routes established to provide safe passage over obstacles, and exist all across the country. Historically, these airways only connected ground-based navigation aids like VORs. More and more, airways are now being established between GPS-based points. It's also more possible than ever to fly "directly" between two points or even straight to your arrival airport.
The advantage to using airways is that obstacle clearance is built in. For example, if you decided to fly directly to KSLC from KJAC, you would be flying over peaks higher than 13,000 ft. with no reliable way of knowing how to avoid them. Airways provide safe passage over terrain by establishing a Minimum Enroute Altitude (MEA) that, if flown, guarantees obstacle clearance, as well as radio and navigation coverage. Finally, airways are used by ATC to establish orderly routes in busy airspace.
Remember how we used SkyVector's sectional chart to navigate in Learning Flight 1? We can do the same thing to plan this IFR flight. Go to SkyVector and locate KJAC. However, instead of viewing the VFR sectional chart, click the "Enroute L-11" tab in the upper right-hand corner of the page.
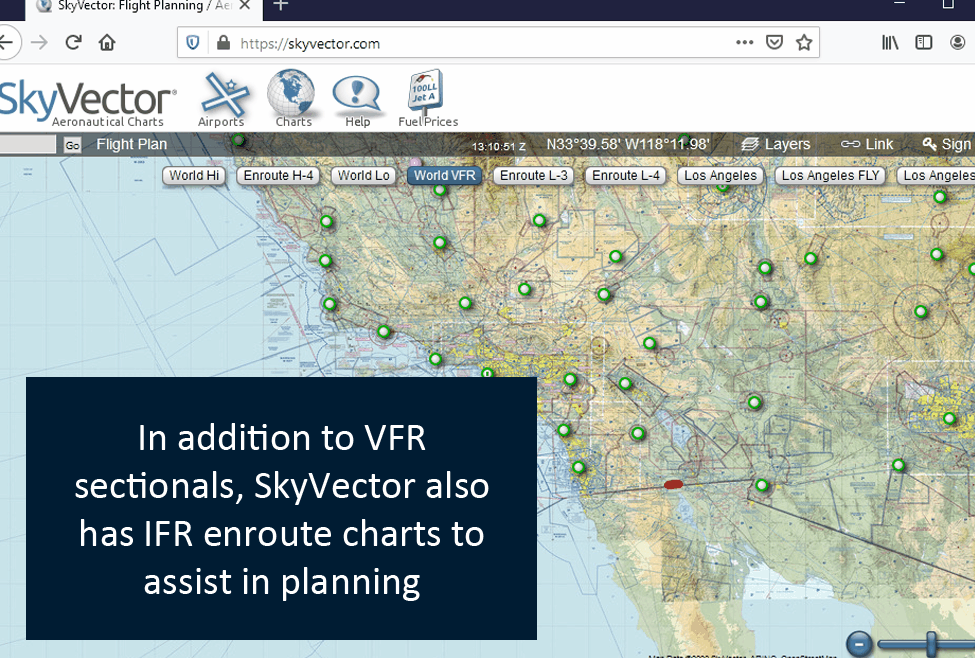
The "L" in the chart name indicates that it depicts low altitude airways, also called Victor airways, which are used for flights below FL180. Just west of Jackson Hole, you'll see IDA—the Idaho Falls VOR that is also one of the transitions on the ALPIN# departure. From there, V21 (and T331, the RNAV/GPS equivalent) connects IDA to the Pocatello (PIH) VOR.
You can plot this route on SkyVector using the "Flight Plan" feature by typing "KICNE" and "IDA" from the SID and then "V21 PIH":

Let's look more closely at V21 between IDA and PIH. We can see the chart provides information about which VOR radials to track, the distances between waypoints, and the MEA to fly between the points that ensures obstacle clearance and radio reception.

Pilot Tip
If you're ever unsure about a symbol on a chart, just zoom out. Each SkyVector chart has a side panel with a legend explaining what each of the published symbols mean. You can also find more information on chart symbols in the FAA's Aeronautical Chart Users' Guide.
For IFR flying, the same "direction of flight" rules apply to altitude as VFR, but 500 ft. is not added:
For IFR flights eastbound (0° to 179° magnetic track), fly at an odd altitude plus 500 feet (i.e. 7,000 ft. MSL).
For IFR flights westbound (180° to 359° magnetic track), fly at an even altitude plus 500 feet (i.e. 8,000 ft. MSL).
When selecting an altitude, look through all components of your route (the SID, airways, and STAR) and determine the lowest MEA. At KJAC, the ALPIN# departure requires pilots to maintain 15,000 ft. between KICNE and IDA. The V21 airway MEA is 7,000 ft. Finally, the BEARR# arrival has an MEA of 15,000 ft. until BEARR. Thus, although it would be possible to fly as low as 8,000 ft. along V21, you would just have to climb back up to 16,000 ft. before PIH.
The lowest safe altitude, corrected for direction of flight, is 16,000 ft., and that's what we're using as our cruising altitude on this flight.
 Objective 3
Fly an Arrival (STAR)
Now that we've discussed departures and enroute navigation, let's look at the Standard Terminal Arrival Route (STAR). Like a SID, STARs are published to provide a transition from enroute navigation (on airways) to busy airport or terminal environments.
An international airport like KSLC has several STARs, offering various arrival paths from different directions. You'll find the list of available STARs for KSLC on AirNav or anywhere else you access IFR charts.
Locate the BEARR# arrival. Conveniently, the Pocatello (PIH) VOR is an available transition. From there, pilots navigate to the Malad City VOR (MLD), then BEARR. Once you have joined the STAR at PIH, navigating along it is very similar to navigating along Victor airways. You'll notice radial information and MEAs are published and, just like on airways, MEAs are simply there to tell you the lowest safe altitude you can descend to along the segment. They are not descent instructions and, in general, you would never fly a STAR at the MEA.

The BEARR# arrival is a two-page STAR. Looking at only Page 1, it's not immediately obvious what pilots do upon reaching BEARR. However, on Page 2, the STAR explains that pilots should:
When "landing north" (i.e., Runways 34L/34R/35), cross DYANN at or above 11,000 ft. and then fly heading 160 until ATC gives vectors for an approach to Runway 34L.
When "landing south" (i.e., Runways 16R/16L/17), fly from BEARR to the Ogden VOR (OGD), cross it at or above 11,000 ft., and expect the ILS RWY 16L approach.
If you're flying with ATC, you can expect to be provided with information about which runway to expect (and therefore which "spoke" of the STAR to follow) as you approach the area. If not, follow the route and waypoints that match the direction you plan to land in. You'd make the choice of runway for landing based on the wind, as you did in Learning Flight 1.
When initially setting up the flight, you may not know which direction (north or south) KSLC is landing. It's also possible the wind could change while you're on the way. Professional pilots look at the weather forecast and plan their flights using expected landing information at the time of departure. Then, using the ATIS, pilots typically evaluate, set up, and brief the arrival and approach for the expected runway about 30 minutes prior to landing.
Most online networks have their controllers publish an ATIS for one or two airports. If there is no ATIS for the airport you are flying into, you can obtain weather information from inside your simulator or real-world sources. You can also ask ATC for the expected landing runway as you approach the airport.
On a STAR like this one, ATC would provide descent instructions. If you're flying offline, you can use the altitude information on the chart to help structure your arrival. Since the MEA on the arrival is 15,000 ft., leaving 16,000 ft. any time before BEARR doesn't make much sense. However, the arrival instructs you to cross either OGD or DYANN (based on your landing runway) at or above 11,000 ft. Thus, descending from 16,000 ft. to 11,000 ft. after you cross BEARR (when the 15,000 ft. MEA ends) would make sense.
Objective 4Fly an ILS Approach
The Instrument Landing System (ILS) is one of the most common instrument approaches used around the world, especially at large, international airports. Although more modern, GPS-based technology exists, commercial aircraft in the United States still most commonly use the ILS as an instrument approach, even in the worst weather conditions. Of the 8 runways at KSLC, 5 of them have an ILS.
The advantage of the ILS approach is that it is a "precision approach", meaning it includes both vertical and lateral guidance. Effectively, the ILS is a "cone" into which the aircraft flies that leads directly to the runway. The localizer works much like a VOR, providing lateral guidance to the runway. The glideslope provides vertical information to allow the pilot to remain on the intended glide path right to just a few hundred feet above the ground.
All ILS approach charts provide the same general information. For this flight, we'll look at the ILS RWY 16L approach. However, based on the runway of intended landing, you can review the actual approach you plan to use at the time in a similar fashion.
When ATC is online, the landing runway will be assigned when you first contact Salt Lake City Approach. Like any other IFR procedure, you can also make requests. For example, when the airport is landing north, the BEARR# arrival advertises the ILS RWY 34L approach. However, if you are planning to park at the FBO (located off taxiway "K" on the east side of the airport), you might prefer to land on Runway 35. You can certainly make this request with ATC to avoid a long taxi after landing. It's a good practice to make the request on initial contact with the approach controller to allow ATC time to try to accommodate your request.
If you do choose to use Runway 35, be aware there is no ILS approach for that runway. There is an LDA approach, which offers almost the exact same thing (including a glideslope). An LDA is just like an ILS but is offset from the runway (by 4.7° in this case). Unlike the ILS, landing on the LDA RWY 35 approach will require a slight visual correction to align with the center of the runway as you descend through about 250 ft. AGL.
Pilot Tip
Looking For More Details on ILS Approaches? Boston Virtual ARTCC's Wings Over New England (WINGS) program covers ILS approaches in much more detail. In this program, you'll only see the ILS once: in this flight. As a result, we'll focus on the most important components of the ILS RWY 16L chart. If you're interested in learning more about flying ILS approaches, and doing several of them (with ATC watching and providing feedback), visit bvartcc.com/wings for information about this free series of learning flights.
For this flight, we're looking at the ILS RWY 16L at KSLC. For now, the important things identify on the chart are:

When ATC is online, pilots can expect to receive headings and altitudes to become established onto the localizer (although ATC may also clear pilots to fly the OGD transition). From there, an approach clearance authorizes you to descend on the glideslope. ATC will not provide information about the frequency or final approach course to program into the airplane; pilots must be able to find this information and set up the approach well before landing.
Just like an IFR clearance, an approach clearance follows a specific pattern, referred to by the acronym "PTAC", which is pronounced "Pee-tac":
Position (distance from a fix published on the approach).
Turn (a final vector to intercept the approach course).
Altitude (an assigned altitude to maintain until established on a published segment of the approach).
Clearance (the actual clearance to fly the approach procedure).
A sample IFR clearance given by ATC to an aircraft flying to Salt Lake City might sound like:
"N12345, five miles from IRRON, turn right heading one three zero, maintain 11,000 until established on the localizer, cleared ILS Runway 16L Approach."
After receiving an approach clearance, it's important to comply with the instructions immediately. If you (slowly) read your entire approach clearance back to ATC before you start to comply, there is a good chance you may end up flying through the localizer. Because the approach clearance is so time sensitive, you'll need to multitask: as soon as you receive the turn or vector during the approach clearance, begin executing the instruction immediately and read back the clearance. By the time you are finished reading back the clearance, your aircraft should be starting the turn. Otherwise, it's too late.
After rolling out on the final intercept heading, smoothly turn onto the localizer as the needle on your navigation radio moves towards the center. Maintain the last ATC-assigned altitude. After establishing on the localizer, you may begin descending via the glideslope towards the runway.
Although it is a regular practice in some parts of the world, pilots in the United States should not report "established on the localizer" unless explicitly asked to do so by ATC.
Pilot Tip
Like at KJAC, KSLC sits at an elevation of over 4,200 ft.. When you cross the OGD VOR at 11,000 ft., you're less than 7,000 ft. above the ground. Keep the high-altitude considerations applicable to your aircraft in mind. That could mean adjusting mixture settings or considering a reduction in aircraft performance as you plan your takeoffs and landings in each of these flights.
When flying the approach, the first step is to become established on the localizer (the lateral portion). You should join this approach north of IRRON, at least 22.4 DME from the localizer (and about 20 miles from the runway). Once you have joined the localizer, you can descend below 11,000 ft. by following the glideslope. Once you reach 4,427 ft. (or 200 ft. above the ground), you're at the "decision altitude": if you have the runway in sight, you can continue and land. If not, you need to commence a missed approach.
Pilot Tip
A "missed approach" is a set of published instructions for what to do in the scenario where you don't see the runway at "minimums". This will involve a climb and set of lateral navigation instructions to get to a safe holding location. Pilots can initiate a missed approach at any point along an approach.
A "go around", instead, is simply a decision to break off the approach. If you decide to "go around" (for traffic, an unstable approach, or any other reason), you should initially follow the published missed approach instructions. If you are flying with ATC, you will normally receive immediate headings and altitudes for a second approach.
Land and Taxi to Parking
We've discussed FBOs and taxiways before but things can get a little more complex at this busy, international airport. A first look at KSLC's Airport Diagram might leave your head spinning! But remember that this is the exact same concept we dealt with at KBZN and KJAC. The most important thing is to have the Airport Diagram for KSLC ready to go as you're flying the approach. That way, as soon as you land, you can flip to the map and have a reference for where you're taxiing.
Professional pilots look over not only the approach but also the planned inbound taxi instructions when they are doing their arrival planning. As you are reviewing the STAR and ILS, also look at the Airport Diagram and think about where you'll want to go once you exit the runway. For example, if you plan to land on Runway 16L and are parking at an FBO, it would make sense to exit the runway to the left on either "Q" or at the end on "M". From there, it's a quick taxi to either of the FBOs:

If you landed on Runway 16L but instead exit to the right, your life will get a lot more complicated!

If you were able to safely navigate from KJAC to KSLC—and especially if you did it in IMC with ATC—you're ready to move into some of the more advanced IFR topics we'll cover in Learning Flight 3.